A happy coincidence of random ingredients
September 27, 2017
This is the kind of meal that encapsulates the real joy I get from cooking; picking out a few random bits and bobs from the fridge, using up leftovers, rescuing something that was once fresh but is about to become very much the opposite… And ending up with a really tasty dish that’s all of my own making.

No idea what you’d call the result of this particular combination of ingredients (a deconstructed Spanish omelette, maybe, if I felt like being poncy? Or fried eggs and fried potatoes, if I was going to be basic), but it consisted of a pile of boiled purple potatoes left over from my pre-birthday fish supper the other night, half a red onion from the tomato salad with the same meal, some verging-on-very-floppy baby sweet peppers and a tomato that really had seen better days.
Some herby seasoning, a couple of eggs, and here is a frying-pan-full-of-delicious-randomness. There are pretty much unlimited variations on this dish, depending on what you have, but I’ve listed a few suggestions below.
Serves 1
olive oil
1/2 red onion (or 1/2 brown onion, or 1 shallot, or even a couple of spring onions), roughly chopped
leftover boiled potatoes (as much or as little as you have), cut into bite-sized pieces
1 clove garlic
2 baby sweet peppers (or 1/2 red/yellow/orange bell pepper), roughly chopped
1-2 medium tomatoes (or a handful of cherry tomatoes, halved), cut into quarters and core removed
1 tbsp basil leaves (or 1 tbsp parsley), chopped
pinch of cayenne (optional)
2 eggs (or more, or fewer, depending on your appetite)
1 Heat a good glug of olive oil in a frying pan (preferably one with a lid). When hot, add the onion, and cook over low heat until soft. This can take up to 10 minutes.
2 Add the boiled potatoes. You can turn up the heat to make sure the potatoes crisp up a bit, but keep an eye on it and don’t let the onions burn. When the potatoes have started to brown, turn the heat down and add the garlic and a pinch of salt. Stir and put the lid on.
3 Add the peppers, stir, put the lid back on, and cook for 4-5 minutes, until the peppers are soft. Then add the tomatoes and most of the basil (or parsley), stir gently to combine, then put the lid back on. Cook for just a couple of minutes. You want the tomatoes to cook through, but not break up, so don’t move them around too much.
4 Make a well in the middle of the veg mix, tip in the eggs, then put the lid back on. Make sure the heat is quite low, and cook for 3-4 minutes. Check the eggs and if the whites are set and the yolks still soft and runny, sprinkle over the last of your herbs, season with a little salt (and pepper, if you haven’t used the cayenne) and serve.
A Scandi-style birthday supper
September 24, 2017
It’s my birthday today (happy birthday to me!), and to kick things off, I invited my best gals round for dinner last night. Most people look forward to being cooked for on their birthday, but for me cooking is such a pleasurable task, it makes my day if I have the time and space to make a really special meal for my really special friends.
As is often my way, I had one specific ingredient in mind around which I wanted to build the meal – and last night’s dinner was all about a jar of Danish pickled plums. Last week, I’d bought a punnet of bog-standard supermarket plums to make a cake with, but I ate one and it was so utterly tasteless, I couldn’t bring myself to use them. I didn’t want to waste them, though, so I dug around and found a Diana Henry recipe for Danish pickled prunes in her brilliant Salt Sugar Smoke book. I simply replaced the prunes with my plums, and followed the rest of her recipe. (I’ll definitely be making them again, so will post the recipe another time.)
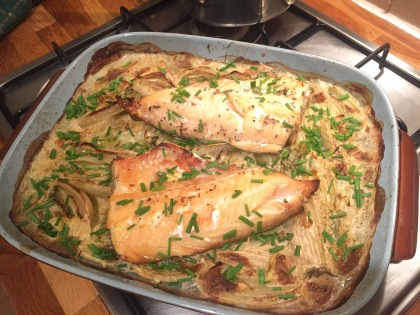
I thought a fish dish would be suitably Scandi, and the gentle sweetness of smoked haddock would be a perfect match for the sharp pickle. Wanting to keep things relatively simple, I went for a one-pot recipe, and the result was baked smoked haddock and fennel, with lemon zest and chives.
I made a tomato and quick-pickled red onion salad for the side, plus some simply boiled baby purple potatoes (which I was very happy to spot at the veg shop, as they are utterly delicious).
Here’s the recipe for the fish:
Serves 4
600g smoked haddock (the natural stuff, if you can get it, in as large pieces as possible)
8 whole peppercorns
1 tsp fennel seeds
1 bay leaf
400ml milk
4 bulbs fennel
zest of half a lemon
2 cloves garlic, thinly sliced
400ml fish stock
olive oil
1 small bunch chives
1 Put the haddock, with the skin still on, in a single layer in a large pot. Add the peppercorns, fennel seeds and bay leaf, and pour over enough milk to almost cover the fish. Put the lid on the pot, slowly bring to a gentle boil, then turn off the heat and leave to cool slightly in the liquid.
2 Heat the oven to 180C fan/gas mark 6. Trim the fennel bulbs, reserving any decent fronds. Quarter each bulb, then slice each quarter in half again. Place the fennel slices in a baking dish so they are tightly packed but in a single layer.
3 Scatter the lemon zest, chopped fennel fronds and garlic evenly over the fennel slices and grind some black pepper over. Strain 200ml of the milk the fish has been cooked in, and add to the fish stock, then pour this over the fennel. This should come to almost the top of the fennel. If you need more liquid, add some more of the fishy milk. Drizzle some olive oil evenly over the top of the fennel.
4 Bake in the oven for about 30-35 minutes – the liquid should have reduced by about half, and it should all be nicely browned – then place the whole pieces of haddock on top of the fennel. Drizzle a little more olive oil on the fish, and grind a little pepper over it. Taste the liquid in the dish, and if it needs it season with a little salt.
5 Bake in the oven for another 10 minutes, until the fish is starting to brown a little, then scatter with a good handful of snipped chives. Serve with boiled potatoes and your vegetable or salad of choice – and something pickled if you have it.

Rhubarb almond crumble cake
April 16, 2017
It’s been quite some time since I’ve posted on my blog – the immediacy of Instagram has made me lazy. But since I recently put up a picture of my rhubarb crumble cake, a few people have been asking for the recipe. So here it is…

Makes 1 x 20cm cake (serves 6-8)
For the crumble
50g unsalted butter, softened
80g plain flour
30g demerara sugar
1 tbsp porridge oats
2 tbsp flaked almonds
For the rhubarb
500g rhubarb (if you have a little more, or a little less, it still works fine)
2 tbsp caster sugar
For the cake
85g unsalted butter, softened
85g caster sugar
2 eggs, room temperature
85g self-raising flour
30g ground almonds
A few drops of milk
1 Set the oven to 180C fan, and grease and flour a 20cm cake tin.
2 Make the crumble by putting all the ingredients, except the flaked almonds, in a bowl and rubbing with your fingertips until the texture of breadcrumbs. Put aside.
3 Slice the rhubarb into 1cm chunks, put in a wide bowl or on a plate and sprinkle over the sugar. Put aside.
4 To make the cake, beat the butter and sugar together in a large mixing bowl until it’s pale and creamy. (It’s well worth having the butter pretty soft for this, as it makes it much easier to cream and lessens the possibility of it splitting when the eggs are added.)
5 In a separate bowl, beat the eggs lightly. Add a little at a time to the butter and sugar and beat until it’s all well combined. (If it starts to split, add a small spoonful of flour – but, to be honest, I find if it splits a little, once all the flour is added, it still comes together fine.)
6 Sift the flour into the wet mixture, then add the ground almonds and gently combine with a metal spoon. If it feels a little stiff, add a few drops of milk – and I mean drops! It should be a reluctant dropping consistency.
7 Scrape the batter into the cake tin and smooth the top. Pile the rhubarb on top of the batter, making sure it’s covered evenly, then sprinkle the crumble topping over the rhubarb, again making sure it’s evenly covered.
8 Put in the oven for about 35 minutes, then scatter the flaked almonds over the top and put back in the oven for another 15 minutes, or until a skewer comes out of the centre of the cake clean.
9 Cool the cake completely before removing from the tin. In fact, this is a great cake to make ahead of time, as it’s even better the day after baking.
A local shop for local people
May 20, 2015
When I moved into my flat on the Peckham/Dulwich borders three years ago, I noticed a funny little shop round the corner on Wood Vale. Named Libretto & Daughters, it wasn’t immediately obvious to me what it was all about.
A mish-mash of a window display, plus a couple of derelict New-York yellow cabs in the forecourt, it could have been as easily a junk shop as a car repair shop.

Libretto & Daughters on Wood Vale, SE22
What it is, in fact, is a fantastic, proper old-school butcher. Run by Kim Libretto (not sure where the daughter is) for the last 30-odd years, it causes a fair amount of debate in the locality. Some people think, because it isn’t neatly set out like a supermarket meat section, it must be a bit dodgy.
Others – ie those who know their rump from their shoulder – love it. I am in firmly in the second camp.
Entering the shop, you won’t find much on display in the chill cabinets, bar a couple of trays of Kim’s excellent homemade sausages. That’s because everything is kept out back, in the form of whole carcasses, ready to be cut to order.
As Kim hauls out entire lambs, pigs or venison, and sets to work cutting chops, fillets and joints, to each customer’s exact request, he’ll chat away, giving advice on the perfect gravy, which cut is best for the barbecue, and where exactly and by whom your venison was shot.
This, as you can imagine, takes time. Which is why you’ll often see a slow-moving queue in the shop. But Kim’s loyal customers love him for it, and it’s all part of the enjoyment of buying from him.
Last weekend, I went in for a joint of pork. I was thinking belly, for a long slow roast, with lots of lovely crispy crackling. When I asked him for this, Kim raised a finger and silently went out to the back room. He came back with an immaculately boned and prepared shoulder of pork.

A perfectly boned shoulder of pork, ready for a good roasting
It had been hung, he told me, so the skin was good and dry, making for perfect crackling. And the meat itself was so juicy and tender, there was no need for the three or four hours a pork shoulder often needs. Kim advised an hour and a half. And, as usual, Kim was right.

Fennel seeds, orange zest, thyme and garlic, to flavour the pork
To flavour the pork, I bashed a few fennels seeds, mixed them with some orange zest and thyme, then smeared that over the skin with some salt and pepper and olive oil. I sliced up the rest of the orange, placed it in a baking tray with a couple of bay leaves and a few cloves of garlic, then plonked the pork on top.

The pork shoulder, ready for the oven
A blast at the highest temperature in the oven for 20 minutes ensured the crackling would, well, crackle, then another hour and 15 minutes at a lower temperature resulted in a juicy, tender roast, full of good porky flavours. I chucked in a sliced leek for the last 20 minutes, which braised in the fat and juice of the pork. Some braised fennel and carrots and some creamy mashed potatoes finished off the Sunday treat.

Roast shoulder of pork
Cake and friends
February 11, 2013
Bloody typical.
Just as I get all enthused about writing my blog again, I come down with a bout of flu on a par with the bubonic plague (without the dodgy armpit sores, thanks be…) (is it okay to talk about armpit sores on a food blog?).
After six days in bed, and more time off work than is good for my bank balance, I’m downright desperate to be back to fiddle-like fitness.
The worst thing about all this is the complete lack of interest I’ve had in food. I’m sure a lot of it is thanks to my tastebuds dying a death – when food becomes nothing but texture and consistency, well, Michel Roux could be standing over me with the finest coq au vin and it might as well be a Findus frozen lasagne.
So, while I await the return of my taste and energy levels, here’s one I made earlier…
My friend Marian is one of my biggest fans. She’s always going on at me to enter The Great British Bake Off, or make her a cake, or set up my own cafe, or make her another cake.
Now, as much as I (normally) like eating, I think baking a cake for someone else is right up there at the top of my list of pleasurable activities. So when Marian asked me to make a birthday cake for her boyfriend a couple of weeks ago, I… actually, that’s a lie. She didn’t ask at all. I told her I was making it, and that was that.
The boyfriend, I was informed, was a fan of carrot cake and chocolate cake. And, as I am most definitely not a fan of carrot cake (and what’s the point of making cake you can’t enjoy yourself), chocolate it was.
A few years ago, I made a chocolate and orange marble cake for Little Sis’s birthday that had both looked and tasted great. Cutting open the cake to see swirls of chocolatey and orangey sponge gives it quite a professional look – even though it’s actually really simple to make. The recipe is from Leith’s Baking Bible, which is a must-have book for anyone who makes cakes regularly.

Ingredients for chocolate and garlic, er, no… chocolate and orange marble cake
All you do is make a traditional sponge batter, split the mixture in two, then add orange zest to one half and cocoa powder to the other.

Spooning the orange and chocolate batters into the cake tin
Then place alternate spoonfuls of the mixtures into your tin until it’s all in. Roughly smooth the top, then get a clean knife and slowly draw a spiral from the centre of the batter outwards. Just the once. This will combine the two batters just enough to create a great marble effect once cooked.

A chocolate and orange marble cake, with a big hole in the top. Well, I had to make sure it was cooked…
Cooking this cake, I came to the realisation once and for all that my oven is pretty damn efficient. Maybe a little too efficient. Hence the great crater in the top. Next time, I’ll remember to turn the temperature down a wee bit. But luckily for this cake, it was being iced, so I could disguise the slight amateurishness of its appearance.
The Leith recipe also suggests sprinkling grated chocolate on top, which is okay, but I think random little chippy bits of chocolate doesn’t always look that great. I thought I’d attempt some proper curls for this one, and while researching the best way to do it, came across a fantastic tip. Instead of all that faff with melting the chocolate, pouring it onto a sheet, cooling, scraping etc etc etc – you do it with a vegetable peeler!
As long as the chocolate is properly room temperature (if it’s too cold, the curls just shatter), and you hold it over the cake so you don’t need to try and pick them up, it really does the trick to great effect. As you can see here…

Decorated with chocolate icing and curls, the cake is ready to be delivered to the birthday boy
The cake went down very well, although I’m not sure the boyfriend was too keen on half a Peckham pub singing him happy birthday in the middle of a Saturday afternoon. But hey, you want cake? You have to sing – or at least be sung to – for it.

So long in the making, and so short in the eating…
Get your skate on…
January 22, 2013
When looking for somewhere to live, I have a feeling I’m led by my nose – or stomach – as I always seem to end up in areas that have a great supply of foodie wonders. And my current location is no different.
Tucked into a lovely little nook where Peckham, Honor Oak and East Dulwich meet, I’m a stone’s throw from such a fantastic variety of shops, cafés, delis and pubs that I’m never at a loss for inspiration.
The best thing is that around 90% of them are local, independently owned places, and that’s just great in this age of the Tesco Metro-type faux-local shops (which, in my opinion, are far more damaging to small independent shops than the monoliths on the edges of towns).
Last night’s dinner was a perfect storm of ingredients pretty much entirely bought in my little nook. A skate wing from a fish stall in Northcross Road; olives, tomatoes and yoghurt from the Turkish supermarket over the road; sprouting broccoli and cauliflower from Herne Hill farmers’ market (okay, a wee bit out of the nook, but still in the SE region).

Bare Cupboard gives you wings
The starting point for this meal was the skate wing. I really wanted to do something other than the usual caper butter with it, so when I came across a recipe for John Dory with broccoli sauce in Anna Del Conte’s Amaretto, Apple Cake And Artichokes, and remembered I had some rapidly fading sprouting broccoli in the fridge, I knew I’d found what I was looking for.
A search through the far corners of my fridge resulted in a rather sorry looking piece of cauliflower, so I thought I’d better use that up quick before it became too floppy to do anything with. But I needed to do something sharp and flavourful with it, otherwise I was likely to end up with a somewhat bland, sweet meal.
And then, in a moment when it felt like all the food gods were smiling on me, I found a recipe in Angela Hartnett’s A Taste Of Home for cauliflower, tomato and olive salad – all of which I had in my fridge.

Angela Hartnett and Anna Del Conte – two of my favourite cookery writers
The salad was a piece of parsley to make. Cut the cauliflower into smallish florets, cook until just tender, leave to cool, then mix with tomatoes and olives, and a glug of vinaigrette. Who would have thought the combination of cauliflower and olives would taste so good? But take my word for it, it does.

Cauliflower, tomato and olive salad
On to the fish.
To make the sauce, sauté a finely chopped onion or shallot in olive oil (Anna’s recipe says butter, but I was looking to make it a bit lighter) in a shallow saucepan or heavy frying pan with a lid. Using a vegetable peeler, take off the tough outer skin of the broccoli stalks, then finely chop the whole lot, leaves and all.
Once the onion is soft, add the broccoli and enough fish stock to just cover the vegetables. Simmer for a good 20 minutes or so, checking the stock hasn’t evaporated, adding more as necessary. Towards the end of cooking, I also added a big handful of parsley, just because I had some that needed using up – but it also gave the sauce a more vivid green colour.

Sautéing finely chopped sprouting broccoli
Once the broccoli is really soft, bung the lot in a food processor and blend until smooth. Add a bit more of the fish stock if it needs loosening. Put the sauce back into a clean saucepan and keep warm while you cook the fish.

The broccoli sauce, waiting for its skate wing
Anna’s recipe for the John Dory says to cook it in white wine – I forgot to get any, so instead I oiled a baking dish, placed the skate in it and covered with fish stock and a good squeeze of lemon juice. I baked it for about 20 minutes at 190°C.
Another minor adjustment to Anna’s recipe was that instead of adding cream to the sauce, just before serving, I plopped in a spoonful of natural yoghurt. I’m not a massive fan of creamy sauces, and as the broccoli was quite sweet, I found the touch of sharpness from the yoghurt gave it a bit of life.

Skate with broccoli sauce, and a cauliflower, tomato and olive salad on the side
The skate wing I had was pretty huge, so half of it was more than sufficient. The other half went in the fridge and was a very tasty lunch the next day, with another bit of salad on the side.
Boozy prune clafoutis
January 18, 2013
Unbelievably, it has been nearly three years since I packed away my London flat, stacked up all my boxes in a storage unit in Brighton and strode off into the Turkish sunset. The sunset scenario didn’t exactly work out, and it’s taken me a while to find my feet again, but finally, I’m back on solid ground, in a lovely flat, with a lovely flatmate, and most excitingly, have all my wonderful kitchen things out of storage and back in their rightful place – in the kitchen.
I’ve been thinking about my blog and how to restart it for a long time now, and have made a few attempts at getting it going again. I’m not sure why, when I have such a great kitchen to cook in now, I’ve been feeling so blocked when it came to writing about my food again. But I’ve decided that, rather than making a big song and dance about it, I’m just going to slide gently back into the blogosphere and hope that a few people join me along the way.
So, prunes.
Now, take that look off your face. They’re not just what your granny eats to keep herself regular, okay? I admit that in my childhood they had all the allure of a dose of Benylin. But, due to the current popularity of Middle Eastern and north African food (thanks, Moro and Ottolenghi), prunes are fast becoming a store-cupboard staple in my home.

Prunes. Not just for your granny
In fact, the reason I had a rather large tub of them in my fridge was because I’d used them in an Ottolenghi recipe for osso bucco with prunes and leeks. And the only prunes I had been able to find locally were in mahoosive quantities.
Last week, I was having lunch with a friend and, as my conversations often do, the topic turned to food, and what I could do with my leftover prunes. “I have just the thing!” exclaimed Zoe. “Stuff them with almonds, soak them in booze and make them into a clafoutis.”
Ooh, I’m not sure about that, I thought.
No, of course I didn’t. I thought, bloody hell, that sounds fantastic! And even better, the recipe Zoe suggested was gluten-free, which meant it would also perfectly suit my sensitively stomached flatmate.
Zoe had said she generally used Armagnac or Marsala for the soaking, but I chose Madeira (mainly because it was the only one I could find in relatively small and cheap bottles). And I think you could probably use any sort of strong-ish alcohol that takes your fancy.

Almond-stuffed prunes soaking in Madeira wine
So, put a whole blanched almond inside about 12 pitted prunes, stick them in a bowl and soak them in your booze of choice overnight.

Ingredients for boozy prune clafoutis
Butter a baking dish. (The one I used here was, in fact, a little too wide and shallow. For these quantities, I’d suggest something about 20cm wide.) Then place the boozy prunes in the dish.

Almond stuffed prunes soaked in Madeira wine
Whizz together 250g mascarpone, 30g ground almonds, 30g soft brown sugar and 2 eggs, until smooth and light. Then pour the mixture over the prunes. Cover the dish with tin foil and bake at 160°C for about 25 minutes, then remove the foil and continue baking for another 15-20 minutes. While waiting, pour the excess Madeira into a wine glass and glug. (Yum.)

Boozy prune clafoutis
Serve immediately out of the oven. In fact, just pick up a spoon and dive in. I’d say this should be enough for four – four very restrained people. In reality, Flatmate and I managed to scoff pretty much the lot in one sitting.
As it should be done.
Beef shin and artichoke stew
April 15, 2012
Hello? Anybody there?
Okay, it’s been a while, but in anticipation of getting back into a kitchen of my own in a month or two, I’m testing the blogging waters again with the occasional post – when kitchen equipment allows.
At the moment, I’m flat-sitting for my good friends Nick and Kerry in the relatively uncharted territory (for Bare Cupboard, at least) of north London. So, while they’re tramping the snow-covered hills of the Lake District, I’m basking in the glow of their tiny but perfectly formed kitchen.
Kerry had thoughtfully pointed me in the direction of a small food market held each Saturday in front of the Tufnell Park Tavern, so I pottered along there yesterday and, among the olives, sourdough levain and free-range eggs, was the thing to inspire this post – a piece of beef shin from organic farm Galileo. I’ve never cooked with that particular cut before, but it was cheap and I was in the mood for something slow-cooked, tender and saucey, so it fitted the bill.
I’d already picked up a couple of nice plump artichokes at the local Turkish grocer for a bargainous 75p each, and was wondering what to do with them. I don’t know whether some dim and distant memory of a recipe was lodged in my subconscious, or it was the inspired genius of my own brain (I like to think it’s the latter), but for some reason I thought a beef and artichoke stew sounded like a very good thing indeed.

And the internet agreed. When I searched for beef and artichoke, I found any number of variations on that theme, so at least I knew the flavours would go well together. I found a good basic recipe for a beef shin stew – without the artichokes – by Jamie Oliver, and liked the idea of the herbs and the cinnamon he used, so decided to go for that, with my addition of a bulb of a fennel, some shitake mushrooms that needed using up, and, of course, the artichokes.
I cooked it according to Jamie’s recipe, but added the fennel and artichokes about half way through the cooking time, because I didn’t want them to turn to a complete and utter moosh. Which turned out to be just the right amount of time. (I actually snuck a taste of the meat after I’d browned it, and, oh boy, did it taste good. And it was surprisingly tender even before it had simmered away for three hours.)
Well, let me tell you, the smell alone while the stew was cooking was incredible. Why the neighbours weren’t breaking down the door, plates in hand Oliver Twist-style, is beyond me. Instead, it was just me – although, unlike Oliver, I did have some more.

You say tomato, I say tomato chutney
August 29, 2011
So, the latest venue for the Bare Cupboard Tour Of South London 2011 is Penge. Another friend on holiday, another chance to spread myself out in a lovely house.
And this one has an equally lovely garden attached to it – one that is, at the moment, an abundance of tomato plants. From crimson-dark pop-in-your-mouth cherry tomatoes to great big knobbly orange ones, never has the word ‘glut’ been more appropriate. (Don’t ask me what varieties they are – I’m an eater not a grower!)
One of the prerequisites of my staying in the Munyama home while they were away was to use up said tomatoes, and, if I could be bothered, to make something nice with them that the family could enjoy when they get back.
The original idea was to make a green tomato chutney, as both Nicky (the tomato-fingered home-owner) and I thought there’d be plenty of unripe ones to use up. However, when I got round to weighing the two heaving bowlfuls of ripe tomatoes I’d picked, I found I already had nearly three kilos!

I did my usual thing of trawling recipes – online and in print form – and came up with a general idea of how I wanted my chutney to taste. I ignored the many recipes that had raisins in the ingredient list, but sensing that something fruity is a necessity in a chutney like this, I went for some apple. And, instead of using white wine vinegar, which seems to be the most popular, I thought I’d use cider vinegar to complement the apple.
The spices I kept simple – white mustard seeds, ground ginger and coriander, with a couple of green chillies thrown in for a little bit of a kick.

The other essential ingredients for a chutney – some roughly chopped onion, brown sugar and salt – were added to the pot, and I set it to boil for about an hour.

I’d worked out the proportions based on a recipe that had used about one and a half kilos of tomatoes, adding extra vinegar and sugar in what I hoped were the right amounts.
In terms of flavour, it was perfect – warm and spicy, with a delicious fresh sweetness – but I was left with rather a lot of liquid. I would definitely use less vinegar next time, adding less sugar too, so the balance of sweet and sour is right.

Even after draining off the excess liquid, I still had enough chutney to fill four half litre jars – and, having read somewhere that a spoonful of chutney in a stew is a rather tasty addition, I bottled the remaining tomato juices and will keep them for such an event.
Now, my jars of spiced tomato and apple chutney are sitting in a cool, dark place awaiting their moment of truth. I – and the soon-to-return Munyama family – will keep you posted.
Whose cupboard is it anyway?
July 31, 2011
After a rather long hiatus, I’m back, back, back. Over the next few weeks, as I try and settle myself back into UK living, I’ll be staying with various obliging friends around London. And, in return, I’ll be doing my best to cook some delicious meals for them. So, I’m kickstarting the blog again, by giving you a sample of my cooking using ingredients that are available in other people’s cupboards.
So, here I am at my friend Claire’s lovely house in Peckham. And oh boy, does she have a kitchen after my own heart. Huge five-burner cooker, double oven, well-stocked with Le Creuset and Sabatier, and, best of all, a great big dining table in the middle of the room. My dream set-up – you can cook for friends while they’re in close enough proximity to chat and drink with.
However, right now, I’ve got the place to myself, while Claire and her kids are on holiday, so my soft return to blogging is a dish for one. And, surprise surprise, it involves pork. (Yeah, something tells me it was never going to work, me living in Muslim country.)
Being a party of one on a Sunday is no reason, in my eyes, not to have a roast. And the small piece of pork tenderloin I found myself with is perfect for that. Because it’s small, it cooks very quickly, and a decent piece gives you a wee bit of leftovers for lunch the next day.
In the fridge were a few bags of herbs (remainders of a lamb shank dish I’d cooked the week before, but had too much red wine by the time I took photos of it, and they turned out to be far from bloggable quality…). I chopped up a big handful of rosemary, thyme, sage, fennel seeds, chilli and garlic, and rubbed it all over the tenderloin, along with a good glug of olive oil and plenty of salt and pepper.
One of the vegetables I missed most in Istanbul was fennel – you get the dried seeds very easily, but no one seemed to have heard of the fresh vegetable part of it. It’s something that seems to go with everything, but it tastes particularly good with pork. So, I quartered a bulb and chucked it into the roasting pan.

Into an oven of about 190ºC (gas mark 5) it went, for about 35 minutes (the two pieces pictured were about 150g each). It’s long been the belief that you have to blast the hell out of pork – not a hint of pinky-ness allowed. But after eating very rare pork in a Spanish tapas restaurant a few years ago, I have well and truly disabused myself of that notion. And, in fact, a report came out recently in the UK that said it was perfectly fine to cook pork to à point.

So that’s what I did with my tenderloin. A couple of boiled tatties and some peas on the side, and this was a very tasty return to a traditional(ish) Sunday lunch.

